How to use macOS to develop for QNX 8.0
In this post I'll show you how to create a build environment on your Mac to build projects for QNX 8.0.

In this post I'll show you how to create a build environment on your Mac to build projects for QNX. Host tools – the tools needed to cross compile projects to run on a QNX 8.0 target – are not available for macOS with QNX SDP 8.0. Since they are available for Linux-based hosts, we can leverage an Ubuntu-based Docker container to create a build environment on our Mac.
This build environment can also be used to port libraries and packages to QNX from Linux. (In fact, these instructions borrow heavily from the already-available Docker environment for Linux hosts, to help with porting.)
https://gitlab.com/qnx/projects/docker-mac
Let's get started.
Step 1 - Prerequisites
This guide only covers the build environment, so it assumes you have some other things installed, configured, and ready to go. Here's the list of prerequisites:
- Get a license for QNX 8.0 (free for non-commercial use), receive it, and deploy it to yourself: qnx.com/getqnx.
- You'll know you're done when you see the license deployed to yourself in the QNX Licence Manager.
- Install Docker Desktop on your Mac and confirm the included Hello World example works: https://www.docker.com/get-started/.
- Install Visual Studio Code: https://code.visualstudio.com/download.
- Use VS Code to install the QNX Toolkit extension (instructions here).
- Install QNX Software Center for macOS Hosts from the myQNX website (direct link).
- Log in to QNX Software Center (QSC) with your myQNX account and activate your license on the License page.
- Get the QNX host tools for Linux and configure VS Code per the two sections below.
Get QNX Host Tools for Linux
The Docker-based build environment needs access to the QNX Software Development Platform (SDP) and the Linux Host Tools. Here's how to get them.
- On the main (home) page of QNX Software Center (QSC), click Add Installation...
- Choose QNX Software Development Platform 8.0 [com.qnx.qnx800] and click Next at the bottom.
- Follow the rest of the wizard, making sure to install the SDP to the recommended
/Users/username/qnx800directory. - When the SDP installation is complete, we can add the Linux Host Tools:
- Go to the Manage Installation section (left menu icon with a checkmark)
- Click the Available tab
- At the top, search for
Host Toolsand find QNX SDP Host Tools (Linux 64-bit) in the list - Click Next at the bottom and follow the wizard to install the host tools

Configure VS Code
There are a few settings to configure in the QNX Toolkit extension for VS Code.
- In VSCode, open View → Extensions.
- Beside QNX Toolkit on the left tab, click the settings cog and choose Settings.
- Set the SDP path to the location you set in step 2 (the default should be
/Users/<username>/qnx800). - Create the folder
~/qnxprojectson your Mac (i.e. in your home directory). - In VS Code, set the Default Project Root to
${userHome}/qnxprojects.


Error: /Users/username/qnx800/host/darwin/x86_64 is not a directory . You can ignore this for now since it shouldn't affect any of the steps needed to build your project.Your host system is now ready with the QNX tools to cross compile for QNX targets. Time to get Docker set up.
Step 2 - Set up a Docker Build Container
We have prepared a Dockerfile and scripts to make this part easier. Here's how to set it up.
- Visit the Docker Build Environment for QNX on macOS repo in Gitlab and get the contents of the repo. You can download it as a ZIP and extract it or you can clone it using git.
- Run
docker-build-qnx-image.sh– this will create an image in the Images tab of Docker Desktop. You should see a new image created called qnx800. - Run
docker-create-container.sh– this will create a container from the image, and will mount your Mac's HOME directory in the container to help with building. You can see the container in the Containers list of Docker Desktop. - Make sure the qnx-build container is running in Docker Desktop.

Our local environment is now fully ready for coding! Next, we'll create a new project and configure it to build using Docker.
Step 3 - Create a VS Code Project
The steps below show how to configure a new QNX project to build in your Docker container.
- Open VS Code, go to the QNX icon on the left, and choose "Create New Project". Note you're prompted for input at the top:
- First, specify a name for the project. We'll use
my-projectin the examples below - Choose Simple Makefile
- Choose C
- Choose Executable
- Click Yes
- First, specify a name for the project. We'll use
- In your new project, open
Makefileand replace the entire contents with the content below. Make sure to change themy-projectpath if you're using a different project name.
default:
    docker exec -it qnx-build /home/${USER}/qnxprojects/my-project/build.sh
Makefile
- Next, create a new file at the root of your project called
build.sh. Note this file also has paths to change if you are not using a project namedmy-project(three places).
#!/bin/bash

source /usr/local/qnx/env/bin/activate
source $HOME/qnx800/qnxsdp-env.sh

cd $HOME/qnxprojects/my-project/

ntoaarch64-gcc -o my-project -Igpio/aarch64/ my-project.c
build.sh
- Modify
.vscode/tasks.jsonand find the block at the top with"label": "QNX: build debug"and change the command value to to justmake. Example:
{
    "version": "2.0.0",
    "tasks": [
        {
            "type": "shell",
            "label": "QNX: build debug",
            "command": "make",
            "options": {
...
.vscode/tasks.json
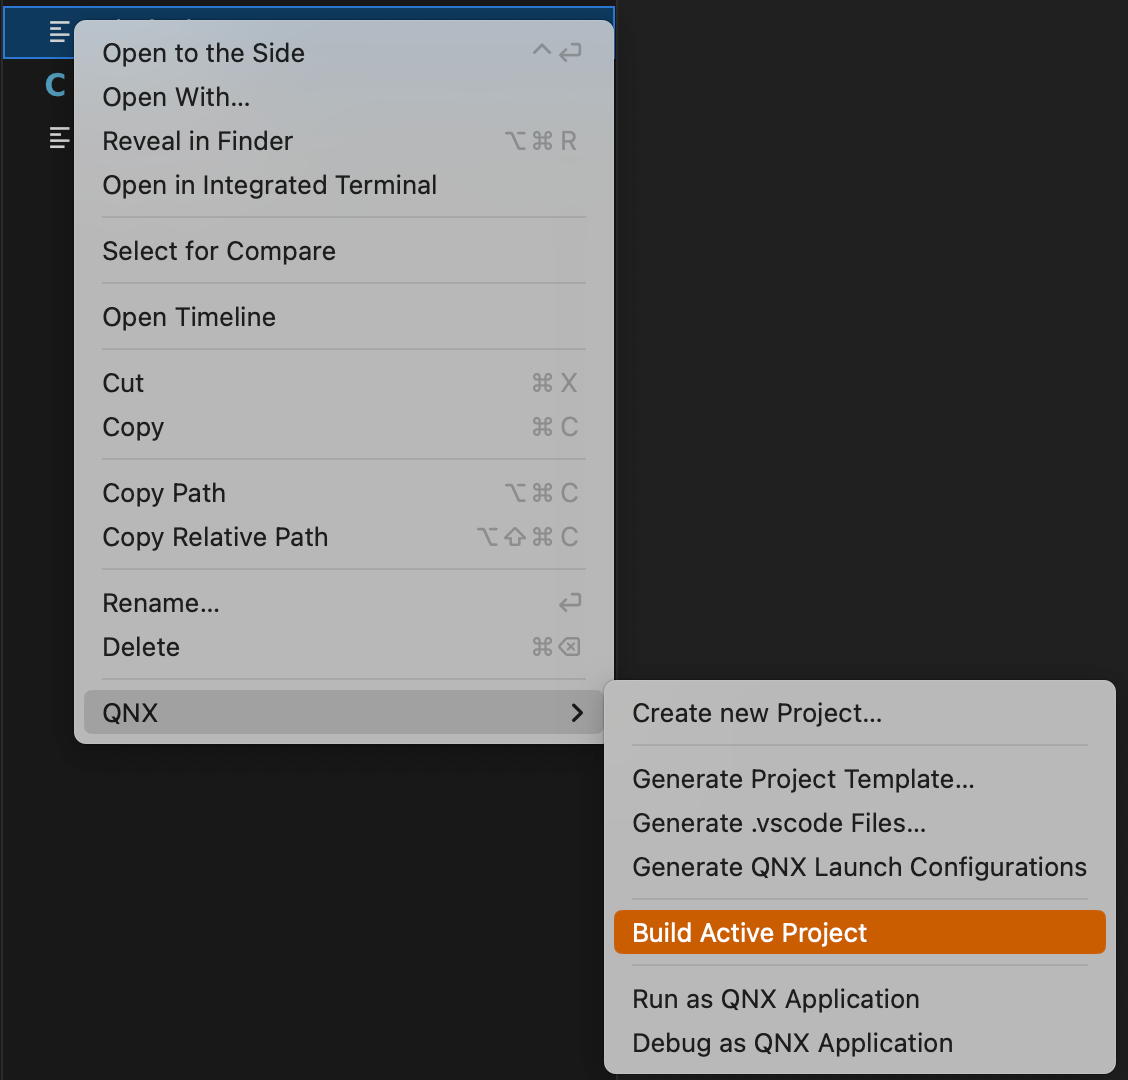
- Your project is now ready to build! In VS Code, right click on your project in the explorer pane, and choose QNX > Build Active Project. In the Terminal pane you should not see any errors. In your project's directory, you should see a binary file appear (for example, a binary file
my-projectwill appear abovemy-project.c).
That's it! You've built a program for QNX 8.0 on your Mac!
Deploy and Run Your Program
You can copy your program to your target using a number of methods, such as with scp:
scp ./my-project qnxuser@10.123.10.10:~Then you can run you project from the target's terminal (ssh, serial, or otherwise):
./my-projectEnhanced Workflow
If you are feeling adventurous, you can modify your Makefile to add additional steps to handle deploying and running your app (to speed up your development workflow). Here's an example:
default:
	docker exec -it qnx-build /home/${USER}/qnxprojects/my-project/build.sh

upload:
	sshpass -p "qnxuser" scp ./my-project qnxuser@<target.ip.address.here>:~

run:
	sshpass -p "qnxuser" ssh qnxuser@<target.ip.address.here> "/data/home/qnxuser/my-project"
Makefile
Now you can quickly copy the app and run it:
$ make upload
sshpass -p "qnxuser" scp ./my-project qnxuser@10.10.10.10:~

$ make run
sshpass -p "qnxuser" ssh qnxuser@10.10.10.10 "/data/home/qnxuser/my-project"
Hello QNX!
An example of making use of new Makefile entries.
Closing Thoughts
Here are a couple of important notes or thoughts about this approach:
- Virtualizing an x86_64 host environment using Docker (especially on an ARM-based processor) will naturally be slower than building natively in Linux. This shouldn't be an issue for smaller projects or ports.
- These instructions should also work in other environments where Docker is supported. Just make sure the QNX SDP and the Linux Host Tools are available in
~/qnx800, and you have an activated license available there. - There was recently an issue reported in the community about Docker on macOS, where the Mac would identify the Docker components as malware. Until this issue is resolved by Docker, you can find workaround steps in GitHub if you are impacted.
Happy building!


