QNX From The Board Up #1 - Prepare A Basic System
In this first post of the series, learn about and prepare to build and run your own basic QNX image from scratch.
Welcome to the blog series "From The Board Up" by Michael Brown. In this series we will build a QNX image from scratch and build upon it stepwise, all the while looking deep under the hood to understand what the system is doing at each step.
With QNX for a decade now, Michael works on the QNX kernel and has in-depth knowledge and experience with embedded systems and system architecture.
My purpose with this series is educational: to talk about how computers work, how operating systems work, and how QNX works. I will do some things that will cause others to say "NO! Don't do that!" and they're right, because they're thinking about the things you should and should not do in deployed systems. However, It's useful to study a wing in a wind tunnel before designing an entire aeroplane.
Quick Background About Me
Not to sound like an apple pie recipe that starts with a tome about an apple peeler-and-corer made with Valyrian steel passed down through a score of generations, but, just so you know where I'm coming from, here's a bit of background to what I'm hoping to do here.
I started working (non-gainfully) with computers in 1980 on 8-bit microprocessors. 6502 (6510), Z80. Simple stuff. Schematics were often available, and I was lucky enough to have access to a copy of The TTL Data Book for Design Engineers. Writing in assembly and working with CPU opcodes in hex was just what you did because you had to. I learned a lot when I designed my first computer and eventually breadboarded it in a manner similar to what Ben Eater is doing these days. (Excellent stuff!)
After a degree in electrical engineering, I took a detour into application software for 9 years then detoured (back?) to some ASIC work on a custom CPU, then another detour (back?) to low level software, working with virtual machines, FPGA-based systems, image sensors, and now the kernel at QNX.
I've benefitted from mentorship and provided mentorship throughout my career, especially with interns over the last decade, and the questions have shifted over time to be from ground up to GUI down. Which makes sense! That's where people are now starting from. I've found it's been helpful to shift their perspective by showing and explaining simple systems from ground up, letting them see what these simple computers are capable of, and lacking compared to modern systems. Once that different view is seen and explained in the context of history, the way things are today makes a little more sense. (Thank you, James Burke.)
Relatedly but separately, I've always been fascinated by Ken Thompson's Summer of UNIX Love in 1969, during which he dedicated three weeks to extend some code he'd written to test part of a PDP-7 into what became the essence of UNIX. With this in mind, it prompted me when developing training material to create no- and low-featured implementations of some UNIX utilities.
BTW, Brian Kernighan's book "UNIX A History and a Memoir" talks a bit about this, and much much more. A very interesting read!
So, back to the recipe for this series:
- take a simple computer,
- add a small, simple microkernel,
- add hastily whipped-up dollops of absurdly simple programs,
- salt to taste.
With that said, let's see if we can pick a very simple computer (target) on which we can get an extremely simple QNX configuration running.
Quick Overview Of QNX
I will oversimplify at first by saying that the operating system known as QNX is a system made up of:
- a QNX kernel, and
- processes (programs).
The functionality inside many of those processes makes up a big chunk of the "system" in "operating system", but for now, the QNX kernel is what we want to get running. That's it.

QNX From The Board Up
To get to the point of running QNX and seeing some kind of output, we need a few things:
- A computer to run it on
- Some way of outputting a message
- An understanding of what that computer does when it begins executing
- A configuration of QNX that takes these things into account.
The remainder of this post will focus on preparing (steps 1-3), and we'll cover step 4 (actually run our own custom image!) in the next post.
1. A Computer To Run It On
QEMU is software that emulates a computer. No soldering required. It doesn't emulate one single computer; it's very flexible and allows you to describe for it the hardware / computer / target that you want emulated. But, that flexibility also means you must describe the computer to be emulated. Fortunately, it's good at providing a lot of useful defaults, and, if you want it to emulate something similar to the computer it's being run on, all the better.
We will be specific about a few things, though. QNX supports 64-bit Intel and Armv8-A systems. For our purposes, we'll choose 64-bit Intel, and that means we'll use the QEMU executable qemu-system-x86_64. (Had we wanted to go with Armv8-A, we'd have chosen qemu-system-aarch64.) It has a default computer configuration that is suitable for our needs, so we don't have to specify much else.
We'll keep the description of our computer simple:
- Emulate a system that is similar to the system we're running QEMU on*:
-cpu max. - Emulate a system that has only one CPU:
-smp 1. - We don't need a fancy display, yet, so, we'll say
-display none.
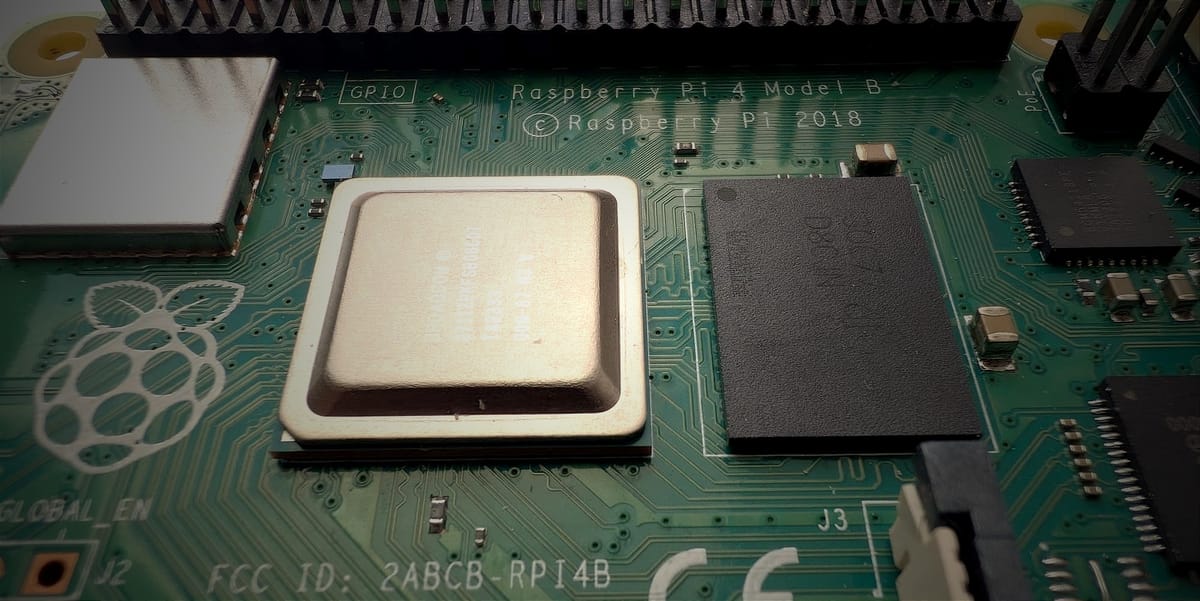
(* For this, I'm running QEMU on an Ubuntu 20.04 machine with Intel Core i7-10850H cores.)
2. Some Way Of Outputting A Message
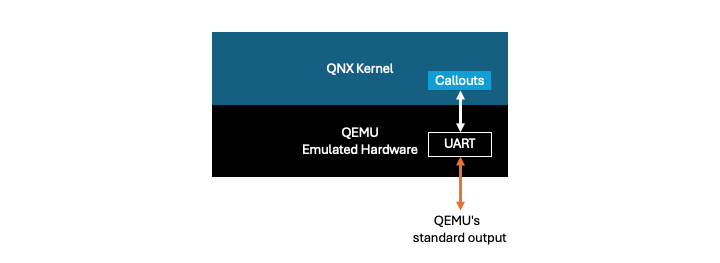
We need some way of interacting with QNX, providing input, and seeing output, so we'll tell QEMU a couple things:
- We need our computer to have a UART, and,
- We want that UART hooked up to QEMU's standard input and output so that we can interact with it via QEMU.
The QEMU default configuration for a 64-bit Intel system comes with a UART by default, so, all that's left is to configure the second part, and this is done with the QEMU command-line parameter -serial stdio.
- receive characters from a dirty beige keyboard, and
- transmit characters to a honkin' huge dot matrix printer.
(In modern times, a fancy terminal has both!)
Quick History (of UART)
The IBM Model 5150 (aka the IBM Personal Computer, aka the IBM PC) came out in 1981. It was based on the Intel 8088 CPU and had a simple set of peripherals, including a UART, the 8250.
The IBM PC became rather popular, so, people wrote software for it. As is the way with things, people want the software that works on "this" computer to work on "the newer version" of that computer. i.e. they want "backwards compatibility" because that means less work to get code that's already working ported over to and working on a new computer.
Therefore, when IBM came out with the IBM Model 5160 (aka the IBM PC/XT), it too had an 8250 UART. (Well, and manufacturing efficiencies to consider.) Then came the IBM Model 5170 with the 16450 UART, which is basically an 8520 plus some more features. Then came the whole "IBM PC compatible" boom, and these IBM PC clones were everywhere, and they all used some variant of the 8250 or its successors. (e.g. the 16550 UART).
This history has heavily influenced modern Intel-based systems. As a result, we know there will be a UART, and how to interact with it.
3. An Understanding of What The Computer Does When It Begins Executing
Again, like with most things, the answer here is: "It depends". We can learn what the CPU does by looking at its user's manual, but this only tells us a few things:
- It comes out of reset in a specific state.
- It fetches the first instruction from a specific location.
- It executes that instruction.
After that, it depends. What is the first instruction that was put into your system? What are the consequences of that instruction?
From the CPU's perspective, it is a simple stimulus and response mechanism. The current stimuli (aka inputs and current state) shall result in a response (i.e. outputs, and a new current state). Lather, rinse, repeat, aka Fetch. Decode. Execute. The CPU does not know nor does it care what these stimuli and responses mean. It just does.
So, what happens next depends on how you design and configure your system.
At this point, some may be tempted to say "Well, the BIOS reads from the MBR and then.." and that may be true for some systems, or was/is true for a specific system, but, it's not always true. What about using cache as RAM? Configuring the DDR controller? What about ME, or PMICs, or PXE, or PSCI?
It depends.
This lack of consistency across systems may then seem daunting because it means that if you want your software to work on as many computers as possible, you have to:
- know about as many systems as possible, and
- incorporate that knowledge into your software.
That is not ideal. To overcome this challenge, we're going to turn to our old friends 'decomposition' and 'abstraction'. i.e. "Let's split up this problem." and "I don't care how you solve your part of the problem."
Decomposition And Abstraction
We want QNX running on a system, and when it comes to a computer, we know that something like the following must happen:
- Power is applied to the computer.
- Something happens.
- Control of the computer is given to QNX.
Rather than incorporate the knowledge of all systems into QNX, we split up the sequence a bit:
- Power is applied to the computer.
- Something happens.
- Control of the computer is given to something that
- knows details about this computer,
- and what QNX needs before it can run.
- Control of the computer is given to QNX.
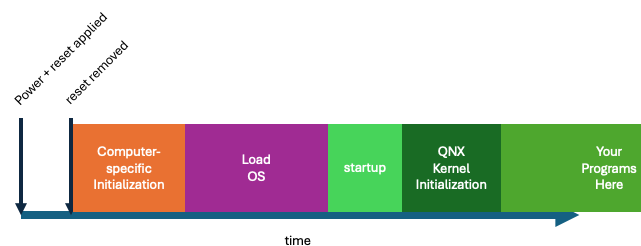
We call the software for Step 3 'startup' (aka the startup, the startup binary), and it is responsible for:
- preparing the computer for QNX,
- describing the computer (e.g. how many CPUs, how much RAM),
- providing access to some basic functionality that QNX needs on all computers, including this one, and
- handing control over to QNX.
About Startup
A startup is very board-specific because it's the thing that knows about this computer, but, there tends to be a lot of overlap between systems based on the same CPU, so, some of this functionality has been split out into a startup library.
Engineering is a human endeavour, and to err is human, so one of the things a startup must provide for all boards is a way for QNX to provide debugging information. This is done, typically, via a UART, so startup will provide a bit of code that QNX can use to write to (and read from) a board-specific UART. More about that later.
Ok. But now what? The Multiboot Specification.
So, now we know that startup will handle a lot of the details, but, that just shifts the problem to be knowing what the computer does before startup and how it gives control to startup.
Here's where our friend 'standardization' comes in. i.e. "I've solved this before. Just do it like I did, and it should work for you. Probably. Maybe. Good luck."
For our purposes here, we'll make use of the fact that some people have standardized the answer to the question "How can I get this computer to run an operating system?" with the Multiboot specification.
Basically, this turns the problem into:
- It's your computer. Do whatever you need to do to get it into a useful state after power is applied.
- Run the code that implements the Multiboot standard so that
- control can be given to an operating system.
Parts 1 and 2 above have to be baked into the computer so it's available when power is turned on. Part 3 is where we need to be.
If we look at the documentation for QEMU, it says for the -kernel command-line option:
-kernel bzImage

    Use bzImage as kernel image. The kernel can be either a Linux kernel or in multiboot format.
That looks like it solves our problem. If we use this option, the computer being emulated by QEMU will use the provided image as something the Multiboot code on the computer can boot.
So, if we take that into account, plus all the other QEMU command-line options we discussed above, that gives us this command line:
qemu-system-x86_64 -cpu max -smp 1 -display none -kernel image -serial stdiowhere image is a Multiboot image we will pass to the computer being emulated.
And that means we have to create a Multiboot image that runs QNX.
And with that, we're now at the Step #4 we mentioned way above.
Coming Up...
In the next post we'll:
- create a QNX multiboot image,
- see how to initialize the QNX kernel, then
- run our image in QEMU to see the results.
Stay tuned!


