QNX From The Board Up #2 - Create a Basic Image
Create a multiboot image with the QNX kernel and run it in QEMU.
Welcome to the blog series "From The Board Up" by Michael Brown. In this series we will build a QNX image from scratch and build upon it stepwise, all the while looking deep under the hood to understand what the system is doing at each step.
With QNX for a decade now, Michael works on the QNX kernel and has in-depth knowledge and experience with embedded systems and system architecture.
Welcome back to the series! From the previous post, steps 1-3 had us identify a computer to run our image (QEMU), identify a way to output a message (UART mapped to stdin/stdout), and understand what the computer is doing when it starts (in our case, expecting a multiboot image). Now for step #4 – creating the multiboot image.
Create A QNX Multiboot Image
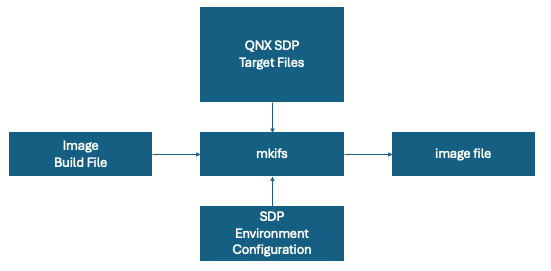
The tool mkifs (make image filesystem) is what we use to create a multiboot image -- and can be used for other image types too. mkifs needs a description of the QNX system to create, and that means we have to cobble together a "build file" which provides that description.
In this build file we have to tell mkifs:
- the method used to boot the OS (i.e. what happens before startup);
- which startup to use;
- which QNX kernel to use;
- a set of commands to run after the QNX kernel is initialized (i.e. start running some stuff!)
Simple Build File
After we pore over the documentation for mkifs, we'll eventually determine we can craft a useful build file that looks like this:
[virtual=x86_64,multiboot] boot = {
    startup-x86 -D 8250
    procnto-smp-instr
}

[+script] init = {
    display_msg "Hello, stranger!"
}
At a high level, we're specifying 2 things in this build file:
- the bootstrap executables (
boot) - the set of commands to be executed when the QNX kernel is initialized (
init)
Bootstrap Executables
Here, "executable" is not used in the sense you typically think of it. It's not the kind of executable you can run from the command-line or double-click on. It's a binary that follows a convention known as the "bootstrap executable" convention. (QNX thing. Long story. We'll talk later.) It's just a binary in an ordered set of binaries that:
- can be given control of the computer so that it
- can do something useful, and then
- hand control off to the next bootstrap executable (if it feels like it).
In this part of the build file, we're instructing mkifs to create an image for the target, specifying:
- the method used to boot the OS (i.e. what happens before startup)
- which startup (a bootstrap executable) to use;
- which QNX kernel (a bootstrap executable) to use;
Note: the startup must be specified first because that's what receives control from whatever is booting the OS.
We tell mkifs that this portion of the build file is describing the bootstrap executables by using the attribute physical or virtual. In our case, since we're emulating a 64-bit Intel computer that implements the Multiboot specification to boot the OS, we specify virtual=x86_64,multiboot.
We named this part of the build file boot because:
- this needs a name, any name, and
bootis descriptive. We could have called itpoddy_dodger, orbootstrap_executablesbut,bootis fine.
startup
startup-x86 is the name of a startup we can usually use for a generic 64-bit Intel system. There are others, but, this is fine for now.
The documentation for startup-x86 provides some important help, describing the -D "debug channel" command-line parameter, (yes, bootstrap executables support "command-line" parameters) and the 8250 option for it, saying, "Use a generic 8250-compatible serial chip, specifying the I/O port base address for the 8250, in hexadecimal. The default is 0x3f8."
That sounds perfect for us: the QEMU documentation says the IO address of the 8250-compatible UART on the QEMU's default 64-bit Intel system is 0x3F8. (We're explicitly telling startup to use the 8250 because by default it assumes more decadent interaction options are available.)
procnto
Then comes procnto-smp-instr, i.e. the QNX kernel. It must be the last item in the list of bootstrap executables.
Once the kernel receives control of the computer from startup, it will initialize itself. (Big story. More on that later.)
And then?
The kernel only responds to external requests for service, be they requests from user processes, or interrupts. So, the kernel has to provide some mechanism to kick things off, and in QNX's case, it starts by running the set of commands specified in the other section of the above build file: the initialization script.
The Initialization Script (init)
Well, once the kernel has done whatever it must do to initialize itself, it's ready to start running executables. Which ones? It depends. It's your system. Do whatever you want. Let's see how to specify this in a build file.
The [+script] attribute indicates that the file named init is (or is to be part of) the initialization script.
init. It could be called fiat_lux or give_er. Whatever. Doesn't matter. Mostly.This is not a 'script' like a text file you'd run in a shell or pass to Python. The commands in the initialization script are converted by mkifs into a succinct set of commands that are supported by the kernel.
Using these commands (e.g. run an executable, wait for a file to exist, ...) you can get everything in your system up and running. If you choose, you can even run just one executable which is your own process launcher and then handle everything else yourself. It's your system.
One of the supported commands is display_msg, which takes a string of characters as an argument, and will (indirectly) use startup's debug functionality to display that string. For our configuration and build file, that means the string "Hello, stranger!" will be sent to the 8250 UART. Perfect!
Build The Image
Ok, based on the description provided in the file image.build, we can now use mkifs to create an image file (image.ifs) using the following command:
mkifs image.build image.ifsThat's it. You can see a lot more about what's going on with the verbosity flag, -v, which can be made even more verbose with more vs, e.g. -vvv.
Pause For A Recap
Before we go on, let's quickly revisit what we've covered:
- A computer is turned on, and then does whatever it does.
- Some computers support the Multiboot specification for specifying how to load an image (an array of bytes) with an operating system.
- We created an image using
mkifswhich:- is suitable for the Multiboot specification,
- has a startup that has been told to use an 8250 UART,
- has a QNX kernel (
procnto-smp-instr), and - has an initialization script which will cause our message to be written to the 8250 UART,
- which is connected to the output (stdout) of the QEMU program.
Telling QEMU To Use The Image
We can now run QEMU in a terminal, asking it to emulate a computer, and provide the image to be booted by the Multiboot specification:
qemu-system-x86_64 -cpu max -smp 1 -display none -kernel image.ifs -serial stdioWe'll see (after some unrelated output) this:
Hello, stranger!And Then What Happens?
Once the kernel is done processing the command(s) in the initialization script, it does what it always does: respond to requests for services.
In our configuration, we've only asked it to display a message, and that's it. So, what's the kernel doing now?
Well, there's always something to be done. Even doing nothing is doing something.
Idle Threads
During kernel initialization, one thread is created in the kernel's process for each CPU. Each thread:
- is runmasked to one CPU (i.e. can only be scheduled on that one CPU),
- has a priority of
0, the lowest priority.
A system with 1 CPU will have 1 idle thread. A system with 64 CPUs will have 64 idle threads; each locked to one specific CPU. Only kernel threads are allowed to have a priority of 0. All other threads must have a priority greater than or equal to 1. Due to the presence of idle threads, there will always be a thread that can be scheduled onto a CPU. In the simplest terms, the idle thread's only job is to run when no other thread is ready to run.
One could implement an idle thread with something as simple as
    while (1) {
    }
but, that "do nothing" loop still involves executing an instruction over and over and over, and that would consume CPU power. To save some power, the idle thread instead executes a CPU instruction that informs the CPU "I have nothing to do. Please reduce your power consumption by not doing anything until an interrupt comes in."
On Intel, this is the Halt instruction (HLT), and on ARM, this is the Wait For Interrupt instruction (WFI).
So, on our single CPU system, after executing the display_msg command, a scheduling decision will be made by the kernel, and the idle thread will be the highest priority thread ready to run (the only thread ready to run), and it will be scheduled onto the CPU, execute the Intel HLT instruction, and the CPU will sit there doing nothing until an interrupt comes in.
Well, this isn't 100% true, but, that's another story.
Coming Up...
In upcoming posts, we'll:
- explore the work the kernel does to initialize itself,
- create a "hello, world" program in C and look under the hood,
- create a simple shell to interact with the system,
- create some basic UNIX utilities (cd, ls, cat),
- and more.
Each of those might not sound like much, but, there is a lot to unpack at each step.
Stay tuned!


