Set Up a Headless QNX Raspberry Pi
In this post, we'll walk you through the process of setting up a Raspberry Pi with QNX OS 8.0 in a headless configuration.

To connect to your QNX Raspberry Pi without needing an attached monitor, keyboard, or mouse, you'll have to set up your board as a headless device. Below we cover two methods for accomplishing this: setting a custom hostname and Wi-Fi credentials on the Micro SD card's /boot partition manually and using a serial debug probe to do it live on the Pi.
Prerequisites
Before we begin, make sure you:
- Follow the instructions to obtain the QNX OS 8.0 quick start target image (QSTI) for Raspberry Pi
- Flash the QSTI image file to your Pi's Micro SD card
Set a Hostname & Find it With mDNS
If your network supports mDNS (likely the case for most home networks), you can set a custom hostname and simply ping your QNX Pi on the network to find it.
How to set a custom hostname and Wi-Fi credentials
- Re-insert your card reader with your Micro SD card into your computer. On most host systems, the
/bootpartition should become available as a mounted drive. You can edit the qnx_config.txt file there to set a custom hostname. For this example I'm using the hostnameqnxpi-john.
HOSTNAME=qnxpi-john- If your Pi is connected to the network via Ethernet, you can skip setting wireless credentials.
Otherwise, in the same mounted drive, find and edit the file wpa_supplicant.conf. (If it doesn't exist, you can create it.) Update thessidvalue to the name of your Wi-Fi network, and thepskvalue to the password:
network={
  ssid="<your-network-name>"
  key_mgmt=WPA-PSK
  psk="<the-password>"
}
Make sure to save and close both configuration files, then unmount and remove the Micro SD card from your host.
Find your Pi on the network
Insert the Micro SD card into your Raspberry Pi and power up the board. Allow about a minute for the boot to complete and for the device to attach to the network. Then you can try to ping it using the hostname you chose above:
$ ping qnxpi-john.local
PING qnxpi-john.local (192.168.1.157): 56 data bytes
64 bytes from 192.168.1.157: icmp_seq=0 ttl=64 time=15.574 ms
Voila, we have our IP. You can now SSH to the board and use this IP to set up development tools like the QNX Momentics IDE or the QNX Toolkit extension for Visual Studio Code.
$ ssh qnxuser@192.168.1.157
(qnxuser@192.168.1.157) Password:
...
qnxuser@qnxpi-john:~$ Use a Serial Debug Probe
If your network settings prevent you from using mDNS or you prefer to interact with the board though a serial connection, this is also possible. You'll need a USB-TTL converter, which provides a basic serial connection between the Raspberry Pi GPIO and your host computer.
- Follow the instructions that came with your USB-TTL converter to connect it. If you're using the Raspberry Pi-branded Debug Probe, the transmit lead goes to pin 8, the receive lead goes to pin 10, and the ground lead can go any ground pin (like pin 6 or 14, for convenience). The power lead should not be connected.
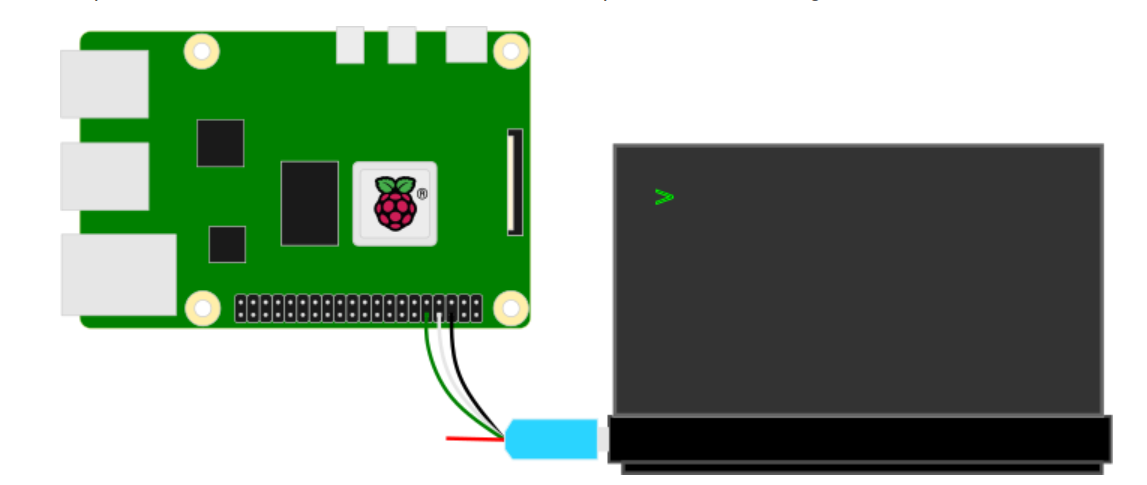
- Once you've booted your Raspberry Pi with QNX and connected the USB-TTL converter to your computer, find and connect to the appropriate serial device on your host computer:
- On Windows, open Device Manager and find the corresponding USB-serial port under Ports (COM & LPT). Then, use a utility such as PuTTY to connect to that serial device with a baud speed of 115200.
- On Linux, find the USB-serial port that corresponds to your Raspberry Pi then use the
screencommand line utility to connect to your Raspberry Pi:
$ ls /dev/ttyUSB*
...
$ sudo screen /dev/ttyUSB0 115200- If you wish, follow the instructions above to alter the hostname and wireless network credentials. When you are ready, you can use
ifconfigto check the network interfaces for an IP address.
More Resources
You can read more about the methods described here in the documentation for the QNX 8.0 Raspberry Pi quick start target image:
- Preparing for first boot: https://gitlab.com/qnx/quick-start-images/raspberry-pi-qnx-8.0-quick-start-image/-/wikis/Getting-started#configuring-for-first-boot
- Create a serial connection: https://gitlab.com/qnx/quick-start-images/raspberry-pi-qnx-8.0-quick-start-image/-/wikis/Interacting-with-the-system#serial-connection